

How To Change The Curtain Wall Mullions Clor Revit 2019
18 Tips To Master Revit Curtain Walls
The Drape Wall tool in Revit can do much more than glazed walls. It tin be used for walls with complex patterns, special railings and even casework.
These tips should help you understand and master this awesome tool.
1- Empathise THE HIERARCHY OF Drapery WALLS
Drapery Walls contains well-nigh properties of a basic wall. They have bottom and top constraints and their profile can be modified. Curtain walls are unlike considering of a few fundamental boosted features. Have a shut look at the prototype below.
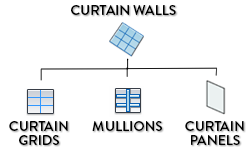
Drape GRIDS
Curtain grids are division created on the walls. These division can be horizontal or vertical.
MULLIONS
Mullions are elements that can be created on each mantle grid segment, as well as on each curtain wall extremities.
CURTAIN PANELS
Curtain panels are rectangular elements located between each curtain grids.
ii- PICK A CURTAIN WALL IN THE TYPE SELECTOR

Drapery Walls are created in the same way every bit regular walls. Select the wall tool in the architecture tab. The divergence is that when selecting a type, you have to scroll downwards to select a wall in the Curtain Wall category. These walls take a glass icon side by side to them.
3- Fill up AN EMPTY Pall WALL WITH GRIDS
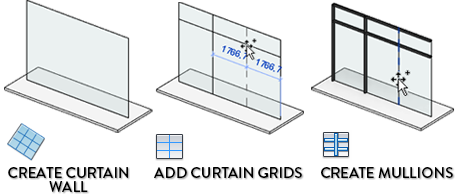
Employ an empty curtain wall type that doesn't use whatever automatic constraints or automated mullions. Create a new wall and prepare all constraints. It will look like a apparently glass wall. Here is how to fill information technology up with curtain wall elements.

Add together Curtain GRIDS:Select the curtain grid tool in architecture tab. Identify your cursor on the edge of the drapery wall or with some other mantle grid intersection. Then click to add the curtain grid. Suit dimensions.

ADD MULLIONS:Select the mullion tool, then click on a drapery grid or on the border of the wall to add them. By default they are created on the complete length of a curtain filigree.
4- CREATE AN AUTOMATIC Drape WALL
Most of the time you desire to employ an automatic drape wall, with stock-still dimensions, specific glass and mullions types. These walls are set to mimic specs from manufacters. Let's build one from scratch.
ADD GRIDS DIMENSIONS:
Select curtain wall and click Edit Type. Set layouts and spacing for vertical and horizontal grids. Utilize Maximum Spacing layout to equally divide your curtain wall. Use Fixed Distance to prepare a specified distance betwixt grids, except for the filler at beggining or end.

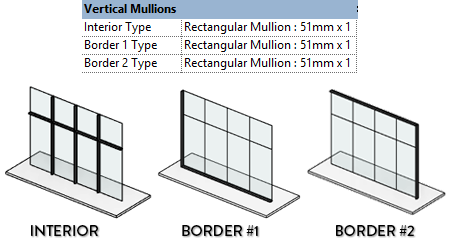
ADD MULLIONS:
In the type properties, gyre to Vertical and Horizontal Mullions category. Add a mullion type to each category. Border 1 are left/bottom mullions, Border 2 are right/pinnacle mullions.
five- EMBED A Pall WALL IN A SOLID WALL
By default, curtain walls will exist embeded in a regular wall, like a window would. Moving the hosting wall volition likewise movement the curtain wall (pivot drape wall to avoid this). To deactivate default embedding, uncheck the pick in the Curtain Wall type properties.

six- Learn HOW TO CREATE A RECTANGULAR MULLION TYPE
Select a mullion, click and duplicate to create new type. Make sure Default profile is selected. Adjust both side of Width. Side 1 is left/ bottom, while Side ii is right/height. Adjust Thickness and Offset, which is the distance from the centre of the mullion to the center of the wall.

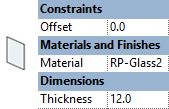
7- Larn HOW TO CREATE A Pall PANEL TYPE
Default pall panels have 3 critical parameters to set: Thickness, Offset and Material. Get-go is the distance betwixt the center of the curtain wall and the eye of the panel.
8- PRESS TAB TO CYCLE THROUGH ELEMENTS
Selecting elements in a curtain wall can be tricky, because by default a click will result in selecting the whole wall. Use tab to cycle through mullions, drapery panels and drape grids.

If you like this post, bank check out the complete Revit Pure Nuts parcel.
9- Right-CLICK MULLION FOR Selection OPTIONS
When you select a mullion, only the segment betwixt two curtain grids will be selected. Right-click to go more than choice options similar in the paradigm below.

x- UNPIN ELEMENTS TO Modify THEM
By default, you tin can't motility or modify elements (mullions, panels, grids) in automatic curtain walls since that would pause the rules set in type. Unpin the elements to make them independant.

11- MAKE Mantle Console A WALL OR AN EMPTY PANEL
The power of curtain walls is that you don't have to only employ glazed panels. In fact, you tin can use any wall type available in your project. You can also brand the mantle panel empty.
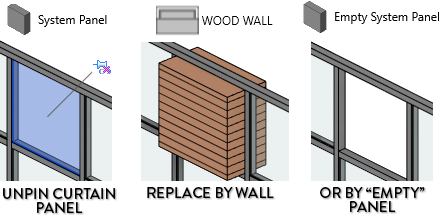
12- SET WALL Console OFFSET
If yous supersede a curtain console by a wall, brand sure to set the offset in the case properties, under Location Line Outset. A negative value for the get-go will button the wall to the interior side.

thirteen- Supercede Drapery Console BY A DOOR
Curtain panels can be replaced past a door. These doors are different from regular doors: their size is dictated by the space betwixt pall grids. Make certain to delete the mullion below the door.

14- Add/REMOVE CURTAIN GRIDS SEGMENTS
By default, curtain grids fill up the entire length of a curtain wall. When selecting pall grids, click on Add together/Remove Segment, then click on segments to remove or add them. Mullions volition be automatically deleted.

15- Gear up Grid JUSTIFICATION IN INSTANCE PROPERTIES
When using Stock-still Distance for grids layout, set the justification in the example properties of the curtain wall.

16- DON'T Motility MULLIONS: MOVE THE GRIDS
This can be confusing for beginners: Mullions can't be moved past themselves. You have to move the drapery grids to which they are attached.
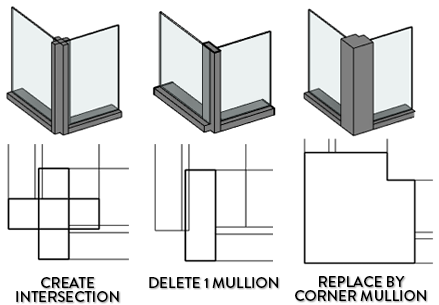
17- USE CORNER MULLIONS AT INTERSECTION
Past default, regular mullions will exist created at the intersection of 2 drapery walls. Delete vertical mullions from one of the wall and supercede the other by Corner Mullions. Corner Mullion types include L-Shaped (used in the image), Five-Shaped, Trapezoid, Quad Corner and Round.
18- Conform MULLION CONTINUITY
Select a mullion, you will run into you the blueish + icon on each extremity. Click information technology to modify continuity on intersecting mullions.


You can besides utilize the tools in the contextual menu, which volition change both extremities of a selected mullion at once.
This procedure can also be automated in curtain wall blazon properties, under the parameter Join Condition.

You similar how clear, easy and simple this guide was? You will dearest the Revit Pure Basics bundle. It'southward a complete tutorial serial to learn Revit with fun and efficiency. Download the complete Curtain Walls affiliate from the series, which contains this entire web log post with additional bonus tips. We promise to keep your inbox clean forever.

Source: https://revitpure.com/blog/18-tips-to-master-revit-curtain-walls
Posted by: bohntheirried.blogspot.com
0 Response to "How To Change The Curtain Wall Mullions Clor Revit 2019"
Post a Comment